Wednesday, 19 December 2012

A Christmas Tag

A little Christmas tag to share with you all today! This was created using Spellbinder Poinsettia and Heirloom Ornament Dies.  I took the largest of the die cut and stamped all over with a music stamp and distressed the edges, all using Barn door. I die cut the poinsettia flower on card and again added distress ink, then I sewed the button into the centre.  I wanted to add some texture, so die cut the leaves using red felt.  Love the finished tag, although took some time to complete!


I would like to enter my tag in the following challenges:


Sunday, 16 December 2012

Manchester Day Out - Christmas Markets

Hi All!
After having a very frosty week, we decided to go into Manchester on Friday to experience the Festive Christmas Markets and it decided to rain!!  We carried on though (after purchasing an umbrella), stopping for lunch in a cabin and a gluhwein.  I took some photos to share with you all.


There are lots of the markets in the city centre.  The Santa photo was taken outside the Town Hall, where it was still very busy, considering the weather.  Good Day out overall, with a few more Christmas presents purchased!xx

Saturday, 8 December 2012

With Sympathy

Evening All!
I recently was in need of making some Sympathy cards and tried to keep them white and delicate in design.
I used my Spellbinder crosses and layered two together.  The background was embossed with the tied together folder, and the pearls were made using the Cosmic Shimmer black glue.


Have a good weekend everyone.
Oksana
x

Tuesday, 4 December 2012

Birthday Card

 
Hi All!
Another simple card today, similar to my previous post, apart from the size of card and this one has a butterfly! The backing paper I have had for some time, then used the off cut to make the butterfly with my Spellbinder dies, added some ribbon and another glittery peel off.x


Saturday, 1 December 2012

Clean and Simple Birthday Card.....

 Good Afternoon Everyone!
I have a clean and simple card to share today that I made a few of, for a craft fayre last week.  I wanted to make as many out of a 12 x 12 piece of card  as I could, so made 4 of these small square cards.
I used my Spellbinder dies for the flower and the scalloped edge, coloured the ribbon with a pink Pro Marker and added a glittery Birthday peel off. Very simple, but a favourite of mine, had to keep one for my myself!
 
 
I would like to enter my card into the following challenges:


Wednesday, 28 November 2012

By the sea....

Hi my friends! Thank you for all your comments whilst I have been absent, I now have a new computer and am back in blogland!
I have a tag to share today. I wanted to use stamping on it and I found my shrink plastic to add some flowers for movement.
 

I cut out a tag shape, then lightly stamped the background with a flower stamp. On a separate piece of card, I stamped the 3 images and then again with the beach stamp.  I then cut out the letters and layered them up. I used my distress inks for water colouring the main image.  The flowers are die cut onto card and shrink plastic (distressed with blue ink), then shrunk down and added.  I also heated my ribbon to give a wavy effect and completed the tag.
I would like to enter my tag into the following challenges:
Joanna Sheen - Anything goes excluding Christmas
Emergency Crafters - Anything Goes
Crafting For All Seasons - Use Flowers

I feel that the tag has a faded, vintage theme so would also like to participate in the Sunday Stampers Week 233 - My first entry!

Thanks for stopping by today.x
 

Wednesday, 24 October 2012

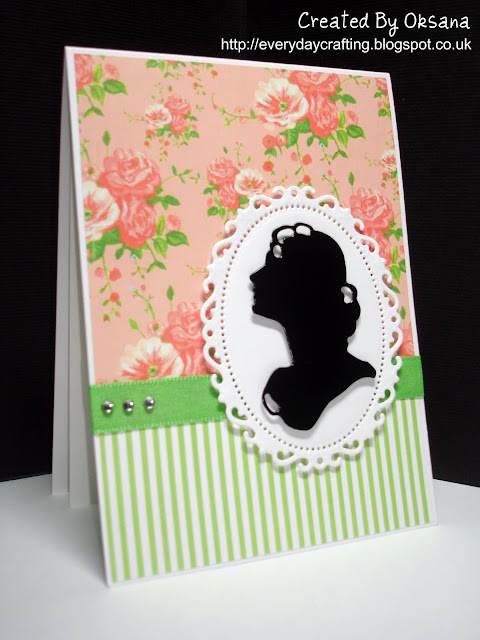
Vintage Cameo

Good Morning All! Apologies for my absence but I have been having computer issues. My card today was based on the recipe over at Emergency Crafter's. I have used a die cut, some ribbon and gems, along with some patterned papers for the background.


I would like to enter my card into the following challenge:


Tuesday, 2 October 2012

Little Princess...

Good Morning! My card today was made for my daughter's friend who was 5 last week. She celebrated with a Princess party so I thought this little image would go perfectly on the card for her. The stamp is from Crafter's Companion and I used my Pro Markers to colour in the image.  For the background I used the tied together embossing folder (so lovely) and cosmic shimmer glues to make the pearls.  I ran out of space to add my 'Little Princess' greeting on the front, so stamped it on the inside to complete.


I would like to enter my card into the following challenges:

Wednesday, 26 September 2012

Rainbow Flowers...

Hi Everyone!  I really enjoyed adding stitching to one of my recent cards, so I have created another card with some on!  This time I drew my own template for the flower stems and hand stitched them with 3 different coloured green threads.  I have added multicoloured flower heads to really brighten up my card.  A different style for me, but very pleased with the result.


I would like to enter my card in the following challenges:


Sunday, 23 September 2012

For The Happy Couple....

Hi All, I have made a similar card to this one before, but have changed a few details and colours this time and added a butterfly!(one of my new Spellbinder dies).  This card is so easy to create, some embossing for the background, I used Promarkers to colour the image in and then die cut it out. Loving my new butterfly die to complete the card!


I would like to enter my card in the following challenges:

Sunday, 16 September 2012

Blue Butterfly Tag....

I have a tag to share with you all today that was created to include a border.  I used my Cheery Lynn Tiffany Border along the bottom of the tag, embossed the background and highlighted both with some blue distress ink. I made the flower, die cut another butterfly in blue and white to embellish and added my sentiment and some ribbon.


I would like to enter my tag in the following challenges:
Cheery Lynn - Borders and Edgers 
Raise The bar - Anything with Wings 

Wednesday, 12 September 2012

Butterflies....

Hi All!  I decided to try hand stitching on my card today and love the soft detail that it adds! I used a beautiful sentiment by Creative Expressions, which I heat embossed and die cut, adding some blue distress ink around the frame. Then simply added the butterflies.  Such a simple, delicate card.


I would like to enter my card into the following challenges:
Cupcake Craft - In Stitches
Emergency Crafters - white with one other colour
Crafty Cardmakers -Winged Things
Creative Harmony - Almost White
Fun with Shapes & More -  must include die cut / blue-white 

Saturday, 8 September 2012

Quick and Simple Card


I made this card some time ago from a tutorial online, but adapted the stamps and edge punch to what I already had.  The flower and border were simply coloured with a promarker and then added the sentiment and some ribbon.  I also used a dotty embossing folder for the background although it doesn't show up so well on the photo.  I really like the design and think it would work in Christmas colours with a poinsettia?  Must give it a try when I get my new Spellbinders poinsetta dies!x

Wednesday, 5 September 2012

Texture

Morning all! Today's card was how I interpreted the theme 'texture' which was the project I made as my entry for the Creative Expressions DT call.  I wanted to use my new antique dress form stamps, so based my card around this theme.


I used a ruler embossing folder for the background and die cut the border and tag shapes.  To create a glossy look, I heat embossed the sentiment and the dress forms on the panel, then added some beige stamping for a contrast.  I made the dress form embellishment out of shrink plastic for movement and added some ribbon and a flower to complete. I am really enjoying making these flowers at the moment!  Have a lovely day everyone, the sun is shining!x

Wednesday, 29 August 2012

Time for Tea......

My card today was inspired by the theme 'Tea and Cake' at Emergency Crafters and also by my new (and first) purchase of a Cheery Lynn Die.  It's the Tiffany border and it's lovely - cuts beautifully also.  The teacup image is a free digital image and I coloured them in.  I embossed the background and gently inked the edges with blue distress ink, the same with the die cut and put the card together. Very pleased with the finished card.(Photo not so good, sorry.)


I would like to enter my card in the following challenges:

Tuesday, 28 August 2012

Seashells

Good Morning All!
A few weeks ago we had a lovely family day out at the seaside in Formby.  The children loved the beach, playing in the sand dunes and collecting shells.  We found lots of them, all different shapes and sizes.  They were brought home, washed, dried and holes drilled in them.  Some of the shells were really tough to drill through, others too small and cracked, but I still had enough to make some decorations for the garden. I simply used clear fishing line, threaded, then tied the shells in place.


I would like to enter my creations into this challenge:


Thursday, 23 August 2012

Très Chic

Good Afternoon All!  
Welcome to my new followers Jenny, Rita and Christine!
Today's card was entered into the Creative Expressions Monochrome July Challenge and I was very, very pleased to win! The prize was three sets of their stamps, they arrived today and are beautiful!
Details of their August challenge can be found here.


I stamped the sentiment using the Kind thoughts stamp set, embossed it and die cut it. For the paper ruffles, I used the textures script stamp and stamped in repeat, then cut strips and made the ruffles.  The flower was made using Rose Creations which I shaped and added black distress ink to the edges.  I also added a centre to the flower, some ribbon and vellum to complete.

Tuesday, 14 August 2012

Butterfly Thank You Card

Hi all! Back today with the card that was shown on Christine Emberson's August Inspiration day last week on her blog.  I have made 'a few' cards recently in red and white and here is another one!  It's a very simple card, but the positioning of the butterflies seemed to take me forever! Hope you all like it!


I would like to enter my card into the following challenges:
That Craft Place - Things with Wings
Stampalot Challenge - "Take Flight"
Catered Crop - White (somewhere on your project)
The Crazy Challenge - Black, White and 1 Other 
Scrapbook Sisters - Things with wings

Friday, 20 July 2012

Summer Days....

Back today with another simple card involving stamping, colouring and some die cutting.  This stamp is designed by Lindsay Mason which I coloured in with Promarkers, then matted and layered onto Romantic Rectangle die cuts.  I wanted the card edge to be the die cut, so I cut my white card to fit underneath for some colour to show through and rounded the edges.  Added some red ribbon and a little flower to complete.


Thursday, 19 July 2012

Thank you card

A short post today with a little thank you card. I really enjoyed using red and white, so have continued with this colour theme. I stamped the roses in repeat and then added my embossed image at the side.  The join was covered with some ribbon and some gems added as accents.  I stamped and embossed the thank you greeting - not done any embossing for a while and almost forgot what a lovely finish it gives.


Saturday, 14 July 2012

Red and White 'girly' card

I have a red and white card to share with you all today. Christine Emberson held a July Inspiration day last week on her blog, which helped me to create this 'girly' card. I began with some simple stamping with my rose stamp and used this along the bottom half.  I used a dress form die cut and layered it with a dress from the same stamped card and then made the paper ruffles! Such a lovely technique and really adds dimension to the card!  To complete, I added some ribbon around the card and the dress along with a flower embellishment.


I would like to enter my card in the following challenges:

Tuesday, 10 July 2012

Thank you

I have recently began to take part in challenges with my creations and last month I was so happy to win 2! The first was a Sarah Hurley challenge with my Red, White and blue card and the other was with Samuel Taylors with the same card where I won these wonderful crafty items.

Just wanted to say thank you very much! Also, thank you to my followers who leave me such wonderful comments on my posts!x

Wednesday, 4 July 2012

First Christmas Card 2012

To make this card, I started off at art class by using Brusho paints to create my background.  These are beautiful, rich colours and I really like to use them. When this was dry I used bleach with my dotty stamp to create the background.  Then I stamped the trees with archival ink for that clean, crisp impression and added my sentiment and cord for dimension.  A very simple card, a bit different, but I'm pleased with the result!


I would like to enter my card in the following challenges:

Friday, 29 June 2012

Quick Card

I have so many unfinished bits and bobs on my desk, that I wanted to create a quick card to share today (as I haven't posted for a while).  I saw this technique on Marion's blog, where you use the solid side of the acrylic stamp to do the background colour and then I stamped over with black. I  really love the effect it gives and so easy too!  


Sunday, 10 June 2012

Red, White and Blue...

With it being 'Diamond Jubilee Week', I thought I must make a card with the theme of red, white and blue.
 I started by using the Tim Holtz dress form die and I added the dress which I cut out from some Union Jack paper. The flowers were die cut from the same paper, layered up and I used gold card candi for the centres.  The sentiment was stamped and added to the card as a finishing touch - love this sentiment!


I would like to enter my card into the following challenges:

Wednesday, 6 June 2012

A Floral Friendship Card

Good Afternoon All!
A friendship card to share today.  I just love this sentiment and the flowers, so wanted to make them the focal point of my card.  To make the frame (which took some measuring and gluing), I used a Martha Stewart punch, then cut the edges diagonally and glued them together!  The Spellbinder Rose Creations flowers were die cut and then I stamped over them with my Dawn Bibby Daisy stamp and made a background to match.


I would like to enter my card into the following challenges:
Tuesday Throwdown - Friendship
Lollipop Crafts - Flowers in Bloom

I love reading all your very kind comments - Thank you all, especially those who  follow my blog.x

Monday, 4 June 2012

Get Well Soon Card

I needed to make a Get Well Soon Card this week for a male, well where do you start?  For ladies, it's fairly easy, just use flowers, but for a man?  At craft club, yesterday, one of the ladies showed me some of her newest Michael Powell stamps and I really liked the one that I have used on my card, which is called 'The Harbourside'.  I have kept it very simple and stamped the image with Vintage photo distress ink and then used my water brush to colour the image.  I have have embossed some white card for the background, to give it some depth and added the sentiment.
 

Apologies about the picture, I found it really difficult to photo due to the delicate colouring and the white card.
 
I would also like to enter my card into the following challenges:

Tuesday, 22 May 2012

Shaped Card

I have a shaped card to share with you all today. This delicate pastel card was created for a 'May Inspiration Day' that Christine Emberson featured on her blog.  She asked us to create a card, tag or layout to show what May means to us!  May to me means flowers in bloom and butterflies in the garden! All the wonderful creations were published on Christine's blog at the start of May,  I have included a link if anyone would like to have a look!

Christine's Blog - May Gallery Day


Wednesday, 16 May 2012

My Daughter's 6th Birthday Card

My little girl was 6 yesterday and this is the birthday card that I made for her.  I am loving using my Spellbinder die to cut this scallop edge, makes the card a little more interesting.  Also using another one of my favourite LOTV stamps, coloured in with my Promarkers, along with some glitter glue to accent the skirt!!!
Really pleased with how it turned out - when she opened it, her words were 'what a pretty card mama!' 
I couldn't decide on which background I liked best, so have shared one on each with you all.  Hope you like them!


Monday, 7 May 2012

Wedding Cards

I really like to make wedding cards and this stamp by Lili of the Valley is one of my favourites.  I have added some soft colouring and used a glitter pen to highlight the dress.  I cut a decorative edge with my Spellbinder dies, added some dry embossing to the top half of the card and some green ribbon to finish.


Friday, 4 May 2012

Something different - Stamped Art


I was recently inspired by a tutorial on Lesley Langdon's blog called 'Framed Stamped Art'. I didn't have the exact paints that she used, so at my art class last week, I tried the technique with Brusho paints.  I then used my stamps and black soot distress ink to complete.  I am very pleased with the result.  I have a few more to complete where I have different colours and will upload these too when finished.


The second photo (not a great photo-apologies), shows the print in a white mount board frame.  Just needs a black outer frame now to complete!

A little note to finish that is not craft related.  On Wednesday this week, my little girl lost her first tooth!  It had been wobbly for over a week and she was so excited about the tooth fairy's visit!


Tuesday, 17 April 2012

Fairy Wings.......

The card I have today was a result of experimenting with different inks and stamps along with my Spellbinder dies.
I also chose different colours to which I usually reach for.


It took me while to put this card together, but I am pleased with the result.  (My photography skills still in need to be improved on, apologies.)
I have a few challenges that I am entering my card into:

Monday, 16 April 2012

'Pysanky' - Ukrainian hand painted eggs

Something different to share today. Quite a long post with lots of photos!
A pysanka is a Ukrainian Easter egg, decorated using a wax-resist (batik) method. The designs are not painted on, but are written with beeswax and then dyes are applied in layers, from light to dark.
This year I have done a few and so have my children. Each egg can take several hours to complete, so they have kept me busy. I also held a workshop recently, where all who came enjoyed the afternoon and went home with a beautifully decorated 'pysanka'.


These are the tools that we use, along with white eggs.  On my egg, I have drawn the design out in pencil and then applied the wax.


Some photos of my daughter (she is nearly 6) applying wax to her egg.  


Next, the egg is placed in a dye.  The first colour is yellow, as we work from light to dark.  We continue this process until all the chosen colours have been applied.  At the end, the wax is melted to reveal the colours.
 

The above, are two of the finished eggs before they have been varnished.
The photos below are when they have been varnished, they look so much shinier and prettier now.(Mine and the children's)


 (Pysanky are one Ukrainian tradition that we enjoy to do at Easter).
 At this time of year, we prepare a basket of food for the Easter Basket Blessing, which takes place at the church on Holy Saturday.  The blessed food is then eaten on Ukrainian Easter Sunday morning for breakfast.  Home baked paska (sweet bread), cooked hams, eggs, horseradish, butter and then the pysanky are added for decoration.  This is our basket below which we all enjoyed for breakfast yesterday morning. (Ukrainian Easter Sunday)

  I have still a few eggs to varnish and will show them on here when they are finished.