Wednesday 24 December 2014

Heartfelt Creations - Silver Snowflakes

Good Evening All on this Christmas Eve 2014!
Hope that you are all ready to enjoy the next few days of festivities with family and friends!
Today, my project on the  Heartfelt Creations blog is a Christmas card to wish you all a Happy
Christmas and Holiday Season Best Wishes!

The products used can be found on the Heartfelt Creations blog, along with many more ideas and inspiration from the design team this week.


Card Size :   10 1/2cm x 10 1/2cm (4 1/4" x 4 1/4")
Instructions:
Create a card blank from white linen card. Emboss another piece of white linen card using the dotty embossing folder.  Cut down to measure 10cm x 10cm (3 7/8" x 3 7/8").  Run your scissors down the sides of this piece to create a rough edge.  Die cut 3 snowflakes from white card.  Dip the snowflakes into the versamark ink and heat emboss using silver powder. ( Do this twice).  Adhere silver twine of different lengths to card securing on the reverse.  Add this piece to the main card front using foam pads.  Die cut the sentiment using the Classic Ticket Die.  Add the sentiment to the card using foam pads. Arrange the snowflakes around the sentiment as shown adhering with foam pads and hot glue.


The products used can be found on the Heartfelt Creations blog, along with more ideas and inspiration from the design team.


Thanks for visiting me today,
Oksana
x


I would like to enter my card into the following challenges:
UK Challenge Blog - Christmas
CAS on Sunday - Christmas


Friday 12 December 2014

Heartfelt Creations - Romantique Birds

Good Morning All! We are getting very close to Christmas now, where has all the time gone? I still have so much to prepare and get ready and no tree up yet! When I was growing up, we used to put up the tree on my Birthday as this then counted down the 12 days to Christmas! Hoping to do it one day next week to make the house more festive whilst making more dried orange decorations - just love the smell around the home from them! Made some a few years ago and they have lasted, just need to make some more to give as little presents.

Here is my project this week for Heartfelt Creations.  A very, very simple quick and easy card to create, with a little silver twine to complete.  I have added glitter accents to the flowers, but it was really difficult to photograph - it is there I promise!

 The products used can be found on the Heartfelt Creations blog, along with more ideas and inspiration from the design team.  Instructions are below.


Card Size :   12 1/2cm x 12 1/2cm (4 7/8" x 4 7/8")
Instructions:
Create a card blank from white card.  Select the paper shown from the paper collection and cut to measure the card front size. Add pink ink around the edges and heat emboss with clear powder. Adhere to the card front using double sided tape. Create a loopy bow using silver twine on the bow maker, add to the card corner as shown.  Secure on the reverse. (I made a tiny hole on the top fold and threaded the cord through).  Add silver twine to the oppopsite corner too.  Add glitter highlights to the flowers and flower centres using a glitter pen. 


The products used can be found on the Heartfelt Creations blog, along with more ideas and inspiration from the design team.


Thanks for visiting me today,
Oksana
x


I would like to enter my card into the following challenge:
Crafty Hazelnut's Patterned Paper - Anything Goes

Thursday 4 December 2014

Heartfelt Creations - Romantique Swans Swimming

Good Morning All! Hope you are all feeling festive now that we are in December? I have my Birthday this month too, which  gets mixed up in all the festive preparations!  I still have lots to do as always and the frosty weather is not helping!

Here is my project this week for Heartfelt Creations.  I wanted to use the beautiful swans and water stamps and created my own inked background.

This card is fairly easy to make and the instructions can be found below.  The products used can be found on the Heartfelt Creations blog, along with more ideas and inspiration from the design team.


Card Size :    11 1/2cm x 11 1/2cm (4 1/2" x 4 1/2")
Instructions:
Create a card blank using white card.  Cut a piece of white card to measure 10 1/2cm x 10 1/2cm 
(4" x 4").  Using stencil tape, create a narrow edged frame on your card. Using the ink dusters, gently add colour to the card. Begin with the pink, then add blue to the lower half.  Add black ink to the water stamp and stamp several times on the lower half - any gaps I filled in using a Promarker pen. Remove the stencil tape carefully.  Using a black Promarker (with a fine nib) and a piece of spare card, create a frame around your work. Cut another piece of white card to cover the card front.  Use the ruler to create a pierced edge.  Adhere to the card using foam pads. Stamp the swans onto white card using black ink and heat emboss with clear powder. Die cut using the matching dies.  Add some detailing with a grey pen and colour in around the edges.  Add the main image to the card using foam pads and also the swans. Create a loopy bow from silver cord ribbon. Add to the card as shown.


The products used can be found on the Heartfelt Creations blog, along with more ideas and inspiration from the design team.


Thanks for visiting me today,
Oksana
x


I would like to enter my card into the following challenges:
UK Challenge Blog - Colouring
Graph'It Colour Challenge - Two Colors


Friday 28 November 2014

Heartfelt Creations - Best Wishes

Good Afternoon All and Welcome this Friday!
Today, Heartfelt Creations have released the Romantique Garden Collection on their website with some Special Black Friday Offers!

My project on the blog today is a card made with the sentiment as the focal point. I thought it really stood out on the black card when I heat embossed it using white embossing powder.

The products used can be found on the Heartfelt Creations blog, along with many more ideas and inspiration from the design team this week.


Card Size :    12cm x 12cm (4 3/4" x 4 3/4")
Instructions:
Select the paper shown from the paper collection and cut to measure the card front. Add pink ink around the edges and heat emboss with clear powder. Adhere to the card front using double sided tape. Stamp the sentiment onto black card using VersaMark ink, heat emboss using fine white embossing powder. Die cut using the second largest circle die. Die cut a lattice piece from pink card. Adhere to the sentiment using glue.  Adhere to the centre of the card front using foam pads. Create a double bow using pink ribbon on the bow maker, add to the card using hot glue. Add the pearl to complete.

The products used can be found on the Heartfelt Creations blog, along with more ideas and inspiration from the design team.


Thanks for visiting me today,
Oksana
x


I would like to enter my card into the following challenges:
Craft-Dee BowZ - Anything Goes with a Handmade Bow
Simon Says Stamp - Anything Goes


Wednesday 19 November 2014

Heartfelt Creations - Celebrate The Season

Good Evening All and thank you all for the lovely comments on my last card.
My project on the Heartfelt Creations blog today is one more Christmas card, mid November already! Have you all started on your own Christmas cards yet?  If not, then this is a really easy Christmas card to create.  I loved this verse which is in the paper collection and wanted to make it the focal point of the card, with a delicate framed edge.

 The products used can be found on the Heartfelt Creations blog, along with more ideas and inspiration from the design team this week.


Card Size :    13cm x 16cm (5" x 6 1/4") (including the framed edge)
Instructions:
Select the sentiment piece from the paper collection and cut out.  Add green ink around the edges
and heat using clear embossing powder.  Die cut 3 lattice pieces from dark red card. Cut two in half and add around the sentiment to create a framed edge.  (Start with the corners first.)  Then cut down the last lattice piece to fill in the gaps.  Secure with glue.  Create a loopy bow from gold twine on the bow maker, add to the card as shown and secure on the reverse.  Create a card blank to fit and adhere with glue to complete.

The products used can be found on the Heartfelt Creations blog, along with more ideas and inspiration from the design team.


Thanks for visiting me today,
Oksana
x


Thursday 6 November 2014

Heartfelt Creations - Holly Berry Christmas

Good Morning All! Thank you so much for all your lovely comments on my card yesterday.
As I posted a Christmas card yesterday, thought I would post another one today. This one is very different and has more of a vintage feel, made using traditional colours. 


Card Size :  10 1/2cm x 15 1/2cm (4 1/8" x 6 1/8")
Instructions:
Cover a white card blank with the gold linen effect paper.  Using the largest rounded rectangle and the largest medium rectangle, die cut these shapes from dark red card.  Using the smaller rectangles, die cut these shapes using paper from the collection as shown.  Cut down the smaller rectangles into a banner edge. Adhere these together. Stamp the sentiment onto vellum using green ink and heat emboss using clear embossing powder. Cut down to measure 3 1/2cm wide. ( 1 1/4"). Adhere the banner shapes into place using foam pads, then wrap the vellum around the card securing on the reverse. Add this to the main card using double sided tape.  Stamp the holly onto cream card twice with green inks and die cut using the matching die. Blend in more green ink to cover the leaves.  On the second die cut, cut off the berries, dip into red ink and heat emboss.  Add the holly to the card as shown and complete by adding the berries.


The products used can be found over at Heartfelt Creations along with more ideas and inspiration from the design team.

Thanks for visiting me today,
Oksana
x


Wednesday 5 November 2014

Heartfelt Creations - Merry Christmas

Good Morning All and apologies for my absence last month.
We had a family wedding which took place in Scotland and with all the last bits of prep to do, I had no time for blogging.  Arrived home on Saturday after a lovely 9 days away on the outskirts of Edinburgh.  I will share a few photos soon.
I am a bit behind with blogging my projects for Heartfelt Creations, so will catch up with these over the next week also.  My project on the Heartfelt Creations blog today is a Christmas card, November already!
This card is really easy to make and I hope to make more to send out as my Christmas cards for this year!  The products used can be found on the Heartfelt Creations blog, along with more ideas and inspiration from the new design team.


Card Size :    11cm x 13 1/2cm (4 1/4" x 5 1/4"). 
Instructions:
Create a card blank from white card.  Add the two distress inks colours to the stamp.  Lightly spray with water, then stamp the image onto white card and allow to dry.  Using the pine needles ink and some water, use your water brush to paint on some white card, allow to dry.  Using the Large Rounded Rectangle: 3 1/2" x 4 1/2", die cut the festive notes background. Using the  Large Rounded Rectangle: 3 3/4" x 4 3/4", die cut a mat from the green painted paper.  Adhere these together using double sided tape.  Stamp the sentiment onto a separate piece of the same green paper and heat emboss with clear embossing powder.  Die cut using the middle sized Heirloom Ornament Die. Create a loopy bow from bright gold twine on the bow maker, add a strip of cord around the top of the card as shown and secure.  Add the ornament using foam pads, adhering the end of the cord behind.  Add the bow using hot glue.  Cut a mat from dark red card and round the corners using a punch - mine measured 10cm x 12 1/2cm (4" x 5"). Adhere together using foam pads.  Add to the card blank using double sided tape to complete.


The products used can be found on the Heartfelt Creations blog, along with more ideas and inspiration from the design team.


Thanks for visiting me today,
Oksana
x


Monday 29 September 2014

Heartfelt Creations - Butterfly Get Well Soon

Good Afternoon All! Hope you all had a lovely weekend!
This is my card created for Heartfelt Creations last week, mainly using the paper from the Sunflower Collection and a Fancy Oval Frame (Creative Embellishments).  I love the butterfly stamps in this collection and  have used them to create my background.  The instructions are below.


Card Size :    11cm x 15cm (4 3/8" x 5 7/8").
Instructions:
Create a card blank from white card. Select the paper shown from the collection and cut to size. Using the Versamark Ink, stamp the larger butterfly onto the paper and heat emboss with the gold embossing powder.  Stamp the smaller butterflies using the black ink.  Add Versamark ink around the edges and heat emboss with the gold powder.  Adhere to the main card blank using double sided tape. Add Versamark ink to the smaller oval frame and heat emboss with the gold powder.  Do this twice and also on the inside of the frame.  Stamp the sentiment in black ink onto a piece of the same paper and heat emboss with clear powder.  Adhere to the frame and cut away the excess (an oval die of the same/similar size could also be used). Adhere the frame to the main card blank.  Die cut the butterflies from yellow and black card, adhere in the centre with glue and add the gems.  Adhere to the card to complete.


The products used can be found on the Heartfelt Creations blog, along with more ideas and inspiration from the design team.


Thanks for visiting me today,
Oksana
x


Thursday 18 September 2014

Heartfelt Creations - Butterfly Dreams

Good Afternoon All! Hope you are all enjoying this lovely sunshine?
This is my card created for Heartfelt Creations this week, mainly using the paper from the collection.  I love the butterflies and had this corner piece of paper left over and couldn't just throw it away, so came up with this card!  The instructions are below.


Card Size :   13cm x 15cm (5" x 5 7/8"). 
Instructions:
Create a card blank from white card. Select the paper shown from the collection and cut to size - mine measured 12cm x 14cm (4 3/4" x 5 1/2").  Choose a section of paper and begin to die cut the hexagonal shapes - die cut them next to each other so the pattern can be pieced together. Arrange and adhere the pieces to the paper using double sided tape on some and foam pads on others.  Trim off any pieces that overlap the edges.  Mat onto some black and then yellow card.  Adhere this to the main card blank.  Cut the sentiment from the paper collection, trim and mat onto black card.  Adhere to the card using foam pads.  Die cut the butterflies from yellow and black card, adhere in the centre with glue and add the gems.  Adhere to the card to complete.


The products used can be found on the Heartfelt Creations blog, along with more ideas and inspiration from the design team.


Thanks for visiting me today,
Oksana
x


Monday 15 September 2014

Heartfelt Creations - Sunflower Burst

Good Afternoon All! Hope you have all had an enjoyable weekend?
Last week, a new collection was launched from Heartfelt Creations - The Classic Sunflower Collection.  I have created a CAS card and used this beautiful sunflower as the focal point - love how this card turned out! The products used can be found on the Heartfelt Creations blog, along with more ideas and inspiration from the design team.


Card Size :   11 1/2cm x 14 1/2cm (4 1/2" x 5 3/4").
Instructions:
Create a card blank from white card. Stamp the image onto white card using Versamark ink and heat emboss with white powder.  Add two distress ink colours (green and yellow) onto an acrylic block and lightly spray with water, stamp over the sunflower with the block.  Add some brown ink to the flower centre.  Allow to dry. Using the largest die from the set and the third largest, die cut a frame from white card.  Adhere the frame to the stamped sunflower image using double sided tape.  Add the yellow ribbon around the card and secure on the reverse. Adhere the framed image to the card using foam pads.  Stamp the butterfly onto black card using Versamark ink, heat emboss with white embossing powder and cut out. Add some yellow ribbon to the centre of the butterfly, tie on the reverse.  Add to the card using hot glue.


Thanks for visiting me today,
Oksana
x


Wednesday 27 August 2014

Heartfelt Creations - Mini CAS Cards

Good Evening! Thank you all for the lovely comments on my recent Christmas cards.  As it's Wednesday, I have two mini cards to share made using products from the Cut, Mat, Create Collection.  These are featured over on the Heartfelt Creations blog today.  Really simple to do!  A few weeks ago, I made a box and two other small cards which I'll share later in the week, and decided to add another two to the collection which are now all on way to the Heartfelt Creations office!


Card Sizes :  8cm x 8cm (3 1/8" x 3 1/8")
Instructions:
Card 1
Create a card blank from white card. Stamp the Caroling Bird image using shades of blue inks directly onto the front of the card as shown. Stamp the sentiment onto white card using blue ink and heat emboss. Die cut using the label strip die.(I made the label shorter by refeeding through the die to trim). Die cut the daisy cluster from white card and arrange around the sentiment.  Add this to the card front using foam pads, complete with some gems.

Card 2
Create a card blank from white card.  Select the paper shown from the paper collection and cut to fit the card front. Adhere to the card front using double sided tape. Stamp the sentiment onto white card using blue ink and heat emboss. Die cut using the square die. Add the same ink around the edges and heat emboss again.  Add the blue ribbon around the card as shown and secure on the inside. Die cut the small leaf and small vine from white card, arrange around the sentiment and adhere in place( I did cut a few swirls off the vine).  Add this to the card front using foam pads. Add the pearls to complete.


The products used can be found on the Heartfelt Creations blog, along with more ideas and inspiration from the design team.

Thanks for visiting me today,
Oksana
x


Tuesday 26 August 2014

Heartfelt Creations - Red and White Ornaments

Good Morning! Hope you all had a lovely Bank Holiday Weekend.  Mine was spent catching up with various jobs at home and shopping for a new iron - how difficult that turned out to be!
I have another Christmas card to share today.  A simple CAS card in red and white.  This one sort of just came together and again could easily be made in batches!
A quick reminder that the current Design Team at Heartfelt Creations is being voted on.  
If you like my style and would like to vote for me then please head over to the Heartfelt Creations Blog.(click here).  Last few days as voting ends on August 29th, 2014. Thank you so much to all those who have already voted!x


Card Size :    12cm x 12cm (4 3/4" x 4 3/4")
Instructions:
Stamp the background image onto white card using the red ink and heat emboss using clear embossing powder. Using two heirloom ornament dies, die cut the shapes.  Emboss a piece of white card with the dotty background embossing folder.  Cut down to measure 11 1/2cm x 11 1/2cm (4 1/2" x 4 1/2"). Add red ink to the edges and heat emboss.  Add a piece of red/white twine to the tops of the die cuts. Add these to the embossed panel using foam pads and secure the twine on the reverse.  Adhere to the main card blank using double sided tape.  Create 2 double bows from red ribbon and secure to the top of the baubles using hot glue to complete.


The products used can be found on the Heartfelt Creations blog, along with more ideas and inspiration from the design team.

Thanks for visiting me today,
Oksana
x


Wednesday 20 August 2014

Heartfelt Creations - Special Christmas Wishes

Good Afternoon All! I'm back home and catching up with things slowly but surely. Please give me a few days and I will visit your blogs.
This month has seen a new release from Heartfelt Creations - The Festive Christmas Collection.  I have made a CAS card so that this beautiful sentiment could be the focal point - love the font used. ( Also, I was trying to think ahead of a simple card that I could make lots of for the festive season!)
As you may have seen, Heartfelt Creations currently have a Design Team Call open, which also means the current Design Team is being voted on.  
If you like my style and would like to vote for me then please head over to the Heartfelt Creations Blog.(click here).  You are able to vote once, but you do need to select 5 or more designers for your vote to count. You will also be entered into a draw to be eligible to win a HC Gift Certificate.  Voting ends on August 29th, 2014. Thank you so much in advance! 


Card Size :    12cm x 12cm (4 3/4" x 4 3/4")
Instructions:
Cut down the paper shown from the collection to measure 11 1/2cm x 11 1/2cm (4 1/2" x 4 1/2"), adhere to the card front using double sided tape. Stamp the sentiment onto white card using the brown ink and heat emboss using clear embossing powder. Cut down to measure 10 1/2cm x 3 1/2cm (4 1/8" x 1 1/4").  Add brown ink to the edges and heat emboss. Die cut the 2 sentiments using the matching oval tag die.  Create a loopy bow using the green/cream twine on the bow maker, thread through the sentiments and wrap the twine around the card twice as shown, securing on the reverse.  Adhere the sentiment using foam pads to complete.


The products used can be found on the Heartfelt Creations blog, along with more ideas and inspiration from the design team.

Thanks for visiting me today,
Oksana
x


Friday 18 July 2014

Heartfelt Creations - Let's Celebrate

Good Morning! Hope you are all enjoying this sunny weather.  The children finished school last week, so trying to plan some activities to keep them occupied before we head off to summer camp later this month.
I have my design team project to share with you all today and it's a CAS card which was very easy to create.  The instructions are below.


Card Size :   10 1/2cm x 13cm (4 1/8" x 5 1/8")
Instructions:
Create a card blank from white card and round the bottom edges using a corner punch. Die cut a large rounded rectangle (3 3/4" x 4 3/4" - HCD 751) from white card.  Using a sheet of paper from the collection, die cut several banner shapes with the Banner/Arrow Die (2 5/8” x 3/4" - HCD 750) and 2 from dark red cardstock.  Trim off the arrow side on them all, cut a few shorter as shown. Add dimension to the ends of the banners. Arrange across the rectangle and glue into place.  Using the twine, create a double bow, tie around the card and secure on the reverse.  Add foam pads and adhere to the main card front.  Stamp the sentiment onto white card using black ink, heat emboss with clear powder.  Die cut the sentiment using the Label Strip die (3 1/8" x 3/4" - HCD 749).  Die cut the daisy cluster (1 3/8" x 2 1/4" - HCD 749) from white card.  Glue in place behind the sentiment and add some pearls to the flower centres.  Add to the card using foam pads to complete.


The products used can be found on the Heartfelt Creations blog, along with more ideas and inspiration from the design team.

Thanks for visiting me today,
Oksana
x


Friday 11 July 2014

Heartfelt Creations - Peaceful Arianna Blooms

Good Afternoon All!
This week has seen a new release from Heartfelt Creations - The Cut Mat Create Collection. Some of you will have seen it on Create and Craft UK TV last week with Emma Lou and Nikki.  It is designed to help create scrapbook layouts quickly and with no measuring at all - simply cut out your photos and they will fit perfectly on a 12 x 12 layout.  The dies can also be used for card making as my card shows below.  Hope you like my card as much I do! Love this bird stamp.


Card Size :   9 1/2cm x 9 1/2cm (3 3/4" x 3 3/4")
Instructions:
Create a card blank from white linen card with the large rounded square (3 3/4" x 3 3/4" - HCD 751).  Cut one more single square and glue to the front.  Stamp the bird twice at angles onto white card with blue ink. Using a blending tool and water, gently water colour the areas as shown.  Die cut using Medium Rounded Square (2 1/2" x 2 1/2" - HCD 752).  Using blue card die cut a Medium Rounded Square (2 3/4" x 2 3/4" - HCD 751) and adhere together. Add to the main card front using foam pads. Stamp the Arianna blooms onto white card using blue ink and die cut with the matching die.  Gently water colour the flowers ( 2 smallest) and form into shape.  Leave to dry.  Die cut 2 stamens (smallest) from blue card, add dimension and glue. Die cut a Small Vine (1 1/4" x 2" - HCD 750) from white linen card and 2 Small Leaves (1 3/8" x 1 1/4" - HCD 751) from blue card.  Arrange the vines and flowers into place and adhere.


The products used can be found on the Heartfelt Creations blog, along with more ideas and inspiration from the design team.

Thanks for visiting me today,
Oksana
x

Friday 4 July 2014

Heartfelt Creations - Pink Cottage Garden

Good Afternoon!  I have my design team project to share with you all today and it's a card in shades of pink and dark red.  I picked up this stamp and asked my daughter what colour ink shall I use, her reply was 'pink' so here is the end result.  The paper collection had this card front to match too!  Such a easy card to make, the instructions are below.


Card Size :   12 1/2cm x 12 1/2cm (4 7/8" x 4 7/8")
Instructions:
Create a card blank from white card.  Select the paper shown from the paper collection and trim slightly to fit card front.  Add pink ink around the edges and emboss with clear powder. Add to the card blank using double sided tape. Stamp the cottage garden with pink ink onto the same paper used before and heat emboss with clear powder.  Die cut using the 2nd largest circle die (large). Also cut a circle from pink card using the largest circle die (small).  Using dark red card, die cut the lacey flower twice and cut the petals apart.  Arrange the petals behind the main image and glue into place.  Adhere to the pink circle using foam pads, then adhere onto the card front as shown.  Create a bow and glue into place using hot glue.  Add the pearls to complete. 


The products used can be found on the Heartfelt Creations blog, along with more ideas and inspiration from the design team.

Thanks for visiting me today,
Oksana
x

I would like to enter my card into the following challenges:
Crafty Ribbons - Anything Goes with Ribbon
Craft Dee Bowz - Anything Goes With a Handmade Bow


Sunny Day Out At Formby - 21.06.2014

Whilst we were having some beautiful sunshine, we packed the car with a picnic, flip flips, sun hats, bucket and spade and set off to Formby beach.  It's about 40 miles for us, so not far really and enjoyed a lovely day out.  This beach has sand dunes along it which the children love to play hide and seek in, although my daughter was easily spotted in her bright outfit!


We collected some shells, and made sandcastles.


Thanks for visiting me today, will be back later with my card for Heartfelt Creations this week.
Oksana
x

Wednesday 25 June 2014

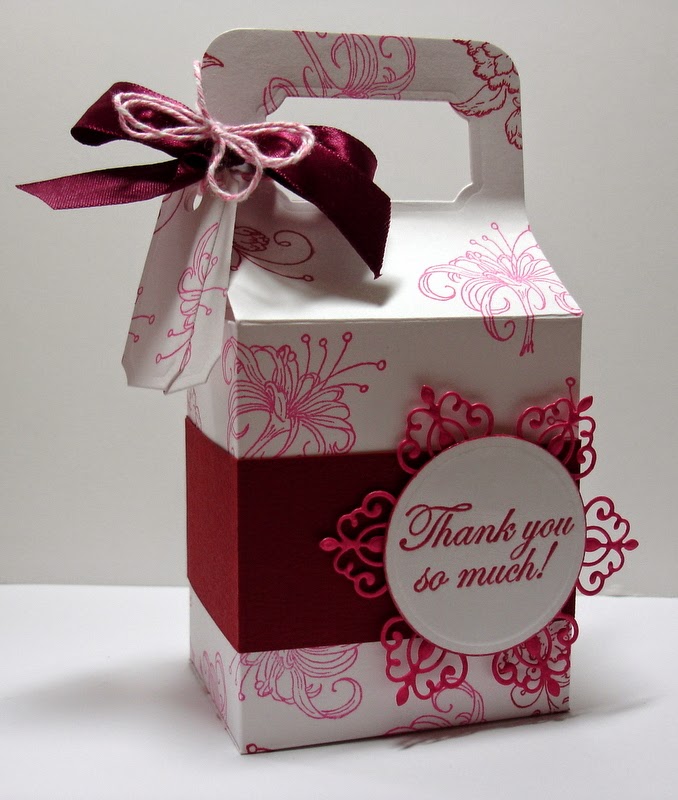
Heartfelt Creations - Thank You Gift Box

Good Afternoon! It's Wednesday, so I have my design team project to share with you all today and it's not a card! I recently found this quick tutorial on how to make this box and I am really pleased with how it turned out - very sturdy too! It would also be good as a Xmas gift project!  I will be having a catch up with your lovely blogs later as I have had a problem with my reading list on blogger - it has just been fixed!


Instructions:
Create the box by using this this tutorial.  Score all your lines then using dark red ink, stamp the Arianna vine over the cardstock.  Next stamp the flourishes in pink ink.  Allow to dry or heat set.  Using the ticket die, die cut your handle shape - keep these pieces.  Add glue/tape to form your box. Create a panel from dark red card to go around the centre by using the same score lines in the tutorial, cut to size and glue in place. Stamp the sentiment with dark red ink onto white card and heat emboss with clear powder.  Die cut using a circle die. Add the red ink around the edges and heat emboss.  Die cut a lace flower from pink card. Glue the sentiment and lace flower together, add to the box using foam pads. Tie ribbon around the handle.  Punch a hole through the tickets, thread onto the twine, form a triple bow and tie around the handle to complete.


The products used can be found on the Heartfelt Creations blog, along with more ideas and inspiration from the design team.

Thanks for visiting me today,
Oksana
x

Friday 20 June 2014

Heartfelt Creations - Mahogany Blooms

Good Morning All!
Today I have another card featuring The Arianna Blooms Collection and it's another yellow card. I don't usually pick yellow as a main colour, but this paper was so pretty, that I used it for my colour combination.
This card also has a story. When I started to design this card, I added ink around the edges of  the paper and heat embossed it, then took a quick photo for the Heartfelt Creations Facebook Page to show work in progress.  When the post went live, I realised that I had photographed the paper upside down, the bird gave it away! When I went to stick down the paper, guess what? I even manged to stick it down upside down, luckily I noticed and managed to remove it, turn the card blank inside out and start again.  Then I cut another piece of the same paper to hide the mess left behind inside.  Got there eventually!


Card Size :   10 1/2cm x 14 1/2cm (4 1/8" x 5 6/8")
Instructions:
Create a card blank from cream card.  Select the paper shown from the paper collection and trim to measure 10cm x 14cm (4" x 5 1/2").  Add the dark red ink to the edges and emboss with clear powder. Add to the card blank using double sided tape. Stamp the sentiment with dark red ink onto cream card and heat embosss with clear powder.  Die cut using the fancy tag die shown.  Trim off the right side of the tag and add to the card using foam pads. Stamp the blooms with the aged mahogany ink and die cut using the matching die.  Select the smallest 3 blooms, blend some of the dark red ink onto the flowers and shape them. Die cut 3 centres from yellow card, shape and add to the flowers. Add some black microbeads to the centre, then add them to the card to complete.

The products used can be found on the Heartfelt Creations blog, along with more ideas and inspiration from the design team.

Thanks for visiting me today,
Oksana
x


Friday 13 June 2014

Heartfelt Creations - Arianna Blooms Collection

Good Afternoon All!
This week has seen a new release from Heartfelt Creations - The Arianna Blooms Collection. A bright collection of background papers, along with beautiful hand drawn stamp images of bird houses, cottage gardens, florals and elegant sentiments.  The Arianna Blooms die allows you to create five blossoms at once, while the Arianna Lace Die contains intricate flowers, lacy doilies, delicate foliage and page accents.

Leave a comment on the Heartfelt Creations blog by June 17th and you will be eligible to win the entire collection valued at $210.90.


A bright yellow and poppy inspired card to share today.  The flower cuts beautifully and I wanted the flower to really 'pop' off the card, so kept it very simple.  Hope you all like it!  

Card Size :   12 1/2cm x 12 1/2cm (5" x 5").
Instructions:
Create a card blank from cream card.  Using the Versamark watermark ink, stamp the swirl stamp around the edge of the yellow paper.  Heat emboss using clear powder.  Add the same ink to the edges and emboss with clear powder once more. Add to the card blank using double sided tape. Die cut two large and one medium blooms from red cardstock and two centres from black card. Shape and create the blooms, add the centres and add some black microbeads to the centres. Stamp the sentiment with black ink onto cream card and heat embosss with clear powder.  Die cut using the tag die. Wrap the twine around the card, thread on the tag and secure on the reverse. Add the flower to the centre to complete.


The products used can be found on the Heartfelt Creations blog, along with more ideas and inspiration from the design team.

Thanks for visiting me today,
Oksana
x


I would like to enter my card into the following challenges:
Moving Along With The Times - Keep It Clean and Simple
My Craft Creations - Anything Goes
Bloggers - Flowers


Thursday 5 June 2014

Heartfelt Creations - Pink Floral Baby Shoes

Good Morning All!  Gosh, I cannot believe that we are into the month of June already.  I'm sorry that I've not been up to date with all your lovely blogs recently, been a little busy with the children, hope to catch up with them all soon. Here is my project featured on the Heartfelt Creations blog yesterday, a pair of pink baby shoes!


Instructions:
Download a baby shoe template, create the baby shoes using the pink Core'dinations card. Add a white card candi to the outer side of the shoes using glue.  Die cut four flowers from white linen cardstock.  Add pink ink around the edges and heat emboss using clear powder.  Add a pink card candi to the flower centres using a foam pad and add to the shoes as shown to complete.

The products used can be found on the Heartfelt Creations blog, along with more ideas and inspiration from the design team.

Today on Create and Craft, Design Team Member Nikki Payne has a One Day Wonder featuring The Arianna Blooms Collection by Heartfelt Creations.
Her shows today are: 11 am,  2 pm,  4 pm,  and 7 pm.
Lots of wonderful products and demonstrations to look forward to!


Thanks for visiting me today,
Oksana
x


I would like to enter my project into the following challenge:
Emergency Crafters - Not A Card


Wednesday 28 May 2014

Heartfelt Creations Wednesday - Darling Baby Booties

Good Evening All!   It's Wednesday, so here is my project featured on the Heartfelt Creations blog today.  A CAS card today using distress inks to create a watercolour effect and adding some bootie die cuts to complete.


Card Size :  14 1/2cm x 10 1/2cm (5 3/4" x 4 1/8"). 
Instructions:
Create a card blank from white linen card.  Add the three inks colours to the stamp starting with the lightest. Lightly spray with water and stamp the image onto white card.  Cut down the area that you want to use - mine measured 10cm x 8cm(4" x 3 1/8"). Cut an orange mat slightly larger and adhere to the stamped image. Add to the card blank using foam pads. Die cut two booties from orange cardstock and thread onto some twine.  Wrap around the card and tie on the reverse.  Add twine and form bows on the booties to complete.


The products used can be found on the Heartfelt Creations blog, along with more ideas and inspiration from the design team.

Thanks for visiting me today,
Oksana
x

I would like to enter my card into the following challenges:
Card Mania - CAS (Clean & Simple)
Less Is More - must be CAS - Die Cut
Simon Says Stamp - Anything Goes


Wednesday 21 May 2014

Heartfelt Creations - Welcome Little One

Hi All! Hope you all have been enjoying the beautiful, sunny weather recently!  We certainly have, just need to finish off my hanging baskets to add some more colour and blooms to the garden!
It's Wednesday, so here is my project featured on the Heartfelt Creations blog today.  A baby boy card simply stamped and then coloured in with promarkers.


Card Size :  13cm x 9 3/4cm (5 1/8" x 3 7/8")
Instructions:
Select the paper as shown from the paper collection and cut out.  Add blue ink around the edges and heat emboss with clear powder.  Adhere to the card front with glue.  Stamp the image onto white card using black ink, colour using the promarkers.  Die cut using the second largest circle die.  Using the aqua cardstock and the middle die in the lacey circles set, die cut the shape.  Adhere both together with glue. Add to the main card using foam pads.  Stamp the sentiment onto white card using blue ink and heat emboss. Die cut using the small tag die in the decorative flower pot die set. Create a loopy bow with the twine on the bow maker, thread the tag through and glue in place on the card as shown. Add the paper backless brad (CardCandi) to complete.


The products used can be found on the Heartfelt Creations blog, along with more ideas and inspiration from the design team.

Thanks for visiting me today,
Oksana
x


I would like to enter my card into the following challenges:
Cuttlebug Mania - Baby
Craft-Dee BowZ - Anything Goes with a Handmade Bow
I Love Promarkers - Anything Goes
Passion For ProMarkers - Use Die Cuts


Friday 16 May 2014

Heartfelt Creations - Sweet Lullaby Collection Release!!

Good Afternoon All!
It's Wednesday and it's time for a New Release from Heartfelt Creations! Everybody loves a baby, that’s why we’re inviting you to fall in love with the Sweet Lullaby Collection.  Preserve special moments spent with your little angel in this endearing baby and toddler themed assortment of papers, stamps and dies.   Shades of sunshine yellow, rose- petal pink and baby blue are the perfect complement for delightful hand drawn images of napping infants and frolicking toddlers enjoying their favourite toys and activities.  Six detailed stamp sets are ideal for creating cards, shower invitations, mini albums, scrapbook embellishments and more. Delicate dies allow you to create lacy baby booties, flowers and a stylish baby carriage. Everything about Sweet Lullaby is precious and adorable…just like your cherished little darlings! 

Leave a comment on the blog by May 20th and you will be entered to win the entire collection valued at $150.00.

My card today, titled Sweet Baby Girl is bright and pink! I have loved working with this collection,  it's gorgeous!


Card Size : 13cm x 13cm (5 1/8" x 5 1/8")
Instructions:
Add the linen look paper to cover the card front.  Cut a piece of pink card to measure 12cm x 12cm
 (4 3/4" x 4 3/4").  Emboss this piece using the Swiss Dots embossing folder through your die cutting machine. Add pink ink around the edges and heat emboss with clear powder.  Stamp the sentiment onto white card using pink ink, heat emboss and die cut using the tag die.  Create a loopy bow with the twine on the bow maker, thread the tag through and tie around the card as shown.   Die cut the pram from white card and adhere using a clear glue.  Adhere this to the card front using foam pads.  Add some pink ink to a piece of white card and heat emboss.  Die cut the tiny flowers. Add these to the card as shown to complete.

The products used can be found on the Heartfelt Creations blog, along with more ideas and inspiration from the design team.

Thanks for visiting me today,
Oksana
x